Cloud Synchronization Setup
MyLifeOrganized Cloud Sync service allows you to wirelessly synchronize data between different devices with MyLifeOrganized installed to keep your tasks and projects up to date on all of them.
When you subscribe to MLO Cloud Sync service and link all your devices with MLO installed to the same cloud file, all changes made on one device are automatically displayed on all the others. You can perform synchronization anytime and in any place where you have Internet connection.
To start using Cloud synchronization with your device you need to sign up with MLO Cloud Sync Service here.
-
Fill out the form with your email address, password and purchased subscription code:
 Tip: If you have not purchased MLO Cloud Sync subscription yet, click 'Buy It' button to proceed with the
payment. If already done, check your inbox to find the subscription code we sent after the purchase.
Use this subscription code to sign up to the service or to renew it.
Tip: If you have not purchased MLO Cloud Sync subscription yet, click 'Buy It' button to proceed with the
payment. If already done, check your inbox to find the subscription code we sent after the purchase.
Use this subscription code to sign up to the service or to renew it.
- Click Subscribe to complete registration.
For already registered users there is 'Sign in' button. Just log into your MLO Cloud account and put the newly purchased subscription code there to renew the service.
Now you need to link your MLO PC to your MLO Cloud.
Note: If you do not use MLO on PC you can skip this step and proceed with Cloud sync configuration for mobile devices.
- Run MLO on your PC and open your file with tasks or create a new one. Note: The local file which contains your tasks on PC has *.ml extension.
- Go to Synchronization -> Configuration -> MLO Cloud or simply click the 'Sync' icon on the toolbar to open the sync wizard.
- In the pop-up window select 'Sync to Cloud' button:

- In the login form enter your MLO Cloud Sync login information (created in Step 1) and click 'Connect'.
- It may take a few seconds for the account verification to complete. Once done, the welcome page will show up.
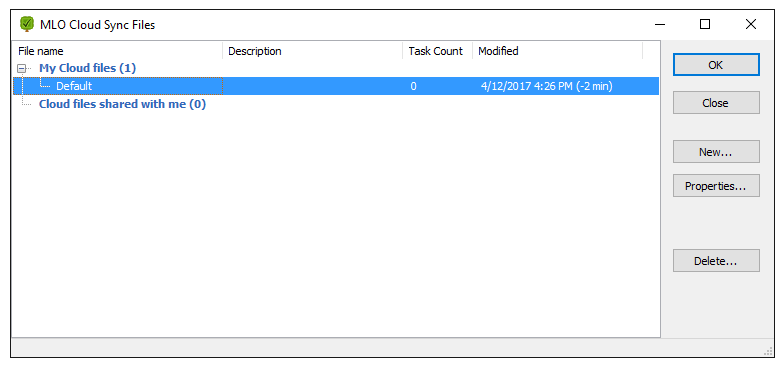
- Click 'Select Cloud file...' to instruct the program to connect your local file with tasks (*.ml) to a specific file on Cloud. Note: It is possible to store several different files in Cloud. Each local file created on your PC or mobile device must be paired with a corresponding Cloud file to sync with it. In most cases it is the same file on Cloud connected to your desktop and mobile devices simultaneously to sync these devices. When you subscribe to MLO Cloud we create the first empty file on Cloud for you with the name 'Default'. You can use this Cloud file to sync all your tasks to it or create new Cloud files for different purposes if you like. If your tasks are already synced to a Cloud file you can create a new empty local file on PC or mobile and connect it to this Cloud file to get your tasks from Cloud to your device. Important: Do not connect the local file to the Cloud file that was previously filled with tasks and has nothing to do with this local file, since it will merge the tasks from different files into one Cloud file and cause confusion.
- Create a new Cloud file (Click New...) or use Default Cloud file and click 'Ok':
- Click 'Done' to complete connecting to the Cloud file.
The pop-up window will ask you if immediate synchronization is required. Click Sync Now to sync your tasks from the file on PC to the selected file on Cloud. Select 'Don't Sync Now' if the item needs some modifications or you simply feel it's not the right time.
Let's connect MLO-mobile to the same MLO Cloud file.
- Open MLO App on your mobile device;
- Swipe right and locate Sync icon on the top line or tap 'Settings' on the bottom line and select 'Synchronization';
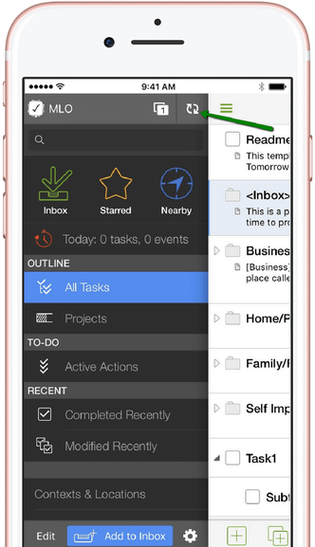
- On a new screen tap 'MLO Cloud';

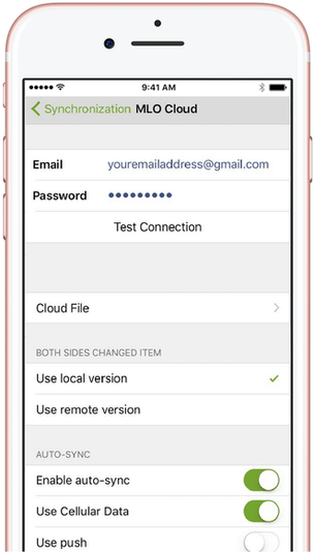
- Enter your login credentials used for signup with MLO Cloud Sync (Step 1);
- Tap 'Test connection' to initiate the account verification.
- Once connected, wait a second until you see a list of your current Cloud files on a new screen.
- Select the same Cloud file that you synced MLO-Windows with (Step 2).
- The pop-up window will ask if synchronization should start right away.
-
If you tap Sync, you will run sync and the default settings will be applied:
- Use local version in case of a sync conflict
- Enable auto-sync (ON)
- Use Cellular Data (ON)
- Use push (OFF)

- Once you are done with the advanced configuration, get back to the first screen;
- Tap Sync icon.

That's it!
Tip: You can configure to sync to the same Cloud file as many desktop or mobile devices with MyLifeOrganized installed as you like.
*Advanced settings (for MLO-mobile)
Advanced settings are used to tune your Cloud sync configuration to your needs.
Both sides changed item
This option controls how sync conflicts should be resolved. Conflicts arise when the same property of the task has been changed on several devices at the same time and then synced. In case a conflict is detected, the app will notify you about the conflict items, not interrupting the sync process as a whole. It will automatically suggest a conflict resolution scenario based on your preferences:
Select 'Use local version' to override the information in the remote Cloud file with the corresponding information in the local profile. A profile on the device you are working with at the moment is called 'local profile'.
If 'Use remote version' is selected, the information in the local profile will be overridden with the information in the remote Cloud file.
You can simply confirm the automatic conflict resolution scenario or process it manually anytime without a risk to lose your data. The values which were rejected during automatic resolution can be edited and restored if needed.
Auto-Sync
All your changes are synced automatically if the option is enabled. If you disable this option you will need to click Sync button manually each time you want to sync.
Use Cellular Data
The option is enabled by default so that your cellular connection is used for Cloud sync when WiFi isn't available.
You will need to turn OFF the option to limit the app from using the cellular network and avoid being charged by your carrier. In this case you are able to use Cloud sync over a WiFi connection only.
Use push
The option is disabled by default which means you need to run MLO to perform sync.
Turn ON 'Use push' to automatically receive all updates made in MLO Cloud in the background even if you do not run the app itself. If you disable PUSH you will save more battery life, but you will need to start MLO to get the latest updates from Cloud.
Tip: You will need to perform at least one manual sync after you enable 'Use push' option to register your device on Cloud servers to receive PUSH notifications automatically in future.
Note: There are some restrictions on iOS devices. The PUSH functionality may stop working on iOS in the following cases:
1. When you unload MLO app from memory. Just start the MLO app again and do not unload it to receive future push notifications.
2. When MLO not allowed to receive notifications in iOS settings. If you did not allow it when MLO requested you can verify and change it in iOS settings->Notifications->MLO.
3. When MLO not allowed to make background refresh in iOS Settings-> General->Background App Refresh-> MLO
4. If there are too many modifications received in background by MLO from the cloud today. To protect your battery iOS may stop forwarding further PUSH notifications to the MLO app in background for the current date if there were too many requests already processed or the requests were too heavy. So if you made too many modifications in MLO-Windows, then start MLO on iOS to sync the changes from the cloud while the app is foreground. All future background sync requests should be processed normally. If it does not restore the PUSH background sync you may need to wait till the other day for the background sync to start working again. Unfortunately this is the restriction implemented by iOS and we can do nothing with it.
Reset Sync
Allows to re-apply synchronization to all the tasks between the mobile device and the Cloud file. Use it only to repair the sync if you are facing issues with synchronized items.